


Listen to this article
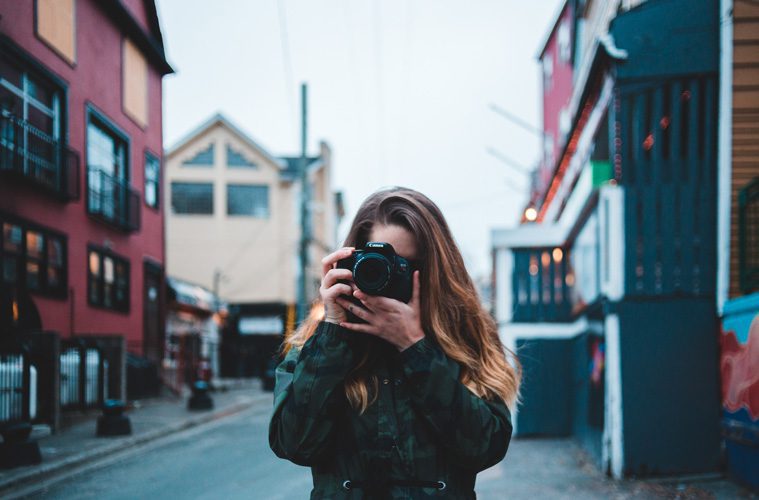
If you want to take a beautiful photograph, point your camera at a beautiful thing. That seems simple enough, but it is amazing how many people miss this most basic rule. Once you have found something beautiful to photograph, here are 10 essential tips to help you better capture and share the beauty.
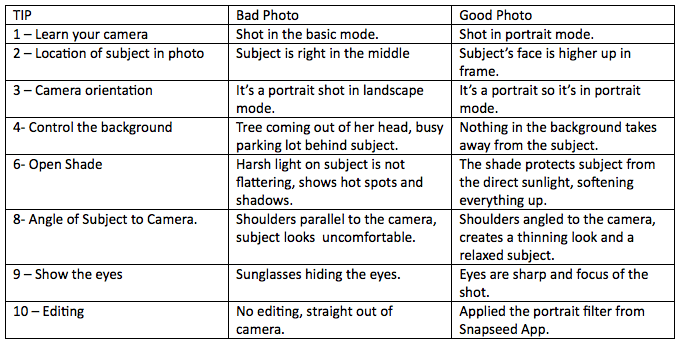
1. Learn all about your camera—even if your camera is a smart phone.
Take time to understand the features and how they work. Read the manual or watch a few YouTube videos. Practice and experiment with the various features. Learn the different shooting modes and how to match those to best capture the type of image you are photographing.
2. Don’t place subjects directly in the middle—especially the horizon.
Imagine a tic-tac-toe grid placed on top of your image. In fact, just about every camera and smartphone has a feature where you can turn on a tic-tac-toe overlay grid in the viewfinder or display. Now place your subject at one of the four intersections where the vertical lines cross the horizontal lines. This is called the rule of thirds, which helps emphasize the subject and allows the eye to naturally be drawn into the photograph.
3. Orient your camera to match the shape of your primary subject.
Think of when you print from your computer and when you choose portrait (vertical) or landscape (horizontal). Those modes are called that for a reason. As a basic rule, when taking portraits, orient your camera with the short side along the horizon. When taking landscapes, orient your camera with the long side along the horizon.
4. Watch out for other objects in front of and behind your primary subject.
Our eyes can naturally ignore things in our field of vision, but the camera cannot. You may not see that tree growing out of your subject’s head or people in the background, but the camera will. Look at the whole scene before shooting the photograph. Move your subject or move your camera angle to create the most pleasing and non-distracting foreground and background for your subject.
5. Take your photos during the “Golden Hour.”
This is the first hour after sunrise and the hour before sunset. The light from the sun when it is low on the horizon is diffused which results in softer light and complementary highlights and shadows. It makes for beautiful landscapes and adds a healthy glow to portraits.
6. Use the daytime shade.
When you want to take a portrait during the day, get your subject into the shade and have them look out toward the sunlight or the open sky. The shade can be by the side of a building or under a tree or umbrella. Be sure your subject is in 100 percent shade and not dappled light.
7. Don’t shoot down on a subject.
This is especially true for children, pets and flowers. Get down to their level. This yields a more pleasing result that focuses on their beauty and not on their size relative to the world in which we live.
8. Point your subject’s feet.
When making a portrait, have the subject point their feet at a 45-degree angle to the camera and then turn their face to the camera. The reason no one likes their driver’s license photo and why mug shots always look so bad is because these photos are taken with the subject’s shoulders parallel to the camera.
9. For portraits, always focus on the eyes.
The eyes are the window to the soul. Therefore, they should never be hidden behind sunglasses. Yes, sunglasses can lend a coolness to a subject, but it’s the eyes that draw a person into a portrait. Make sure we get to see them. And place them along the top horizontal line in the tic-tac-toe grid to make sure they are emphasized in the image.
10. Editing your photo is not a sin.
In fact, all professional photographers do this. Take a little time to learn the tools available. For smartphones, Instagram has some nice filters and tools. So does a product called Snapseed. For digital cameras, Adobe Lightroom has excellent tools in their development module. If you didn’t quite get the composition you wanted, it’s okay to do some cropping.
Following these tips will help improve your photographs. But there is nothing that will make you a better photographer more than practicing and experimentation. If you want to challenge yourself, take and share one photo a day on Instagram or Facebook for an entire month. Or go on a photoshoot and limit yourself to just 24 shots.
Finally, when you want to share your photos with the world via social media, be selective. Each day share just your best single photo, and not a bunch of photos. Don’t let your one great photo get lost among all your other images. If you are traveling and sharing a number of images from your trip, make sure each one represents a unique aspect of your trip. No one wants to see the Eiffel Tower from 10 different angles, or 10 different shots of your family from slightly different angles in front of the Grand Canyon. But we do want to see the best one.
Now go out and start making beautiful photographs. Shoot early, shoot often and shoot the stuff you love. And, most importantly, have fun.
Here’s a visual breakdown of the tips:

Do Good:
- Visit westernusa.salvationarmy.org to find The Salvation Army nearest you.
- Are you busy but want to better your world? Then join us on The Do Gooders Podcast where we feature good ideas to help you do good right where you are. Subscribe today for weekly shows with the best ideas on making an impact.


Great article! Thank you!
This was an excellent article and I learned so much. The photo model is absolutely beautiful! Great work Tim. Thank you for this good information.